NAS
What is a NAS?
A Network Attached Storage (NAS) device is essentially a small, self-contained computer that's designed solely for storing and sharing files. Think of it as your own personal cloud storage, but instead of relying on a third-party service, you own and control the hardware.
Here's why someone might use a NAS:
- Centralized Storage: A NAS provides a single location to store all your files - documents, photos, videos, music, etc. This makes it easy to access your data from any device on your network.
- File Sharing: NAS devices make it simple to share files between multiple users and devices. This is great for families who want to share photos and videos, or for small businesses who need to collaborate on documents.
- Backup and Redundancy: Many NAS devices offer features like automatic backups and RAID configurations, which help protect your data from hard drive failures.
- Media Streaming: NAS devices can be used to stream media files (movies, music) to devices throughout your home, like smart TVs, game consoles, and mobile devices.
- Remote Access: Some NAS devices allow you to access your files remotely over the internet, so you can retrieve important documents or share photos even when you're away from home.
Essentially, a NAS is a versatile and convenient way to manage and share your digital data. It offers more control and privacy than cloud storage services, and it can be a valuable tool for both individuals and businesses.
TrueNAS
TrueNAS is an Open Source NAS operating System / infrastructure solution. In addition to powerful scale-out storage capabilities, TrueNAS SCALE adds Linux Containers and VMs (KVM) so your organization can run workloads closer to data.
Why I switched
Recently I switched over to TrueNas from my off the shelf Terramaster device. I actually really liked the Terramaster, it allowed a 5 drive pool with raid 1 on a BTRFS filesystem. Which meant it was easy to upgrade the drives from 2TB --> 6TB giving me a decent ~24TB size pool (one drive as parity). I got this originally so that I could safely back up my data and store my 10TB+ of VOD recordings from the Live Stream & Youtube. The Terramaster had some pretty big drawbacks. It was only really good for being a simple NAS share.
The proprietary operating System is actual hot garbage.
- the GUI is extremely slow and freezes up a lot
- the built in docker containers and other special features rarely work
- the Recycle bin is hot garbage and runs even when you turn it off (discovered nothing had EVER been deleted)
- the underlying linux OS somehow struggles to do basic things like deleting files
- networking sometimes just broke, ignored static IPs and would ignore DNS due to not properly turning off ipv6
- there is little to no documentation or support outside of Terramaster official forums, which is also hot garbage.
Couple years later my data has continued to grow, including my jellyfin media and other hoarding, so I needed some space. This gave me a nice opertunity to upgrade. I have an older, but still nice PC sitting around as a spare, so this was a good chance to upgrade my NAS with some nice compute as well.
Why TrueNAS
I went with TrueNAS SCALE because it used the newer ZFS2 filesystem which allows for expansion of pools. This would allow me to buy some extra drives, move over my data and then expand using the old drive pool. SCALE also moved over to docker containerization. Side benefit of allowing me to host some extra containers if I want. Its also free and there is a lot of support / documentation out there. It has come a long way from the FreeBSD days.
Refurbished Drives
I had some issues when getting sourcing drives. Things are still pretty expensive atm, so I went with just getting more 6TB and expanding the pool. Can upgrade size later when the prices chill out. Managed to find a good price on refurbished 6TB drives from amazon. However; when they arrived I found that they were all heavily used 4 years+ uptime, reused from some Datacenter somewhere. Fucking scummy Amazon seller. To top it off, some were SAS drives out of NETAPP appliances.
Fuck you Netapp
Netapp is an older shit brand that would lock down their drives with special formatting that forced the customer to use only drives sourced from Netapp. These old Netapp appliances are starting to flood the market as newer / cheaper to run hardware is being deployed.
Success
Luckily, smart people can reformat the drives from their shit Data Integrity Feature (DIF) format back to a normal. This is a long and time consuming process (Took DAYS) as the entire drive has to be reformatted with a normal 512 chunk size.
Note
Thank you smart guy from reddit that pointed me to the smart guy on TrueNAS forum that showed me how to fix these un-usable drives.
TrueNAS has sg_format built in. With this you can reformat all the drives at the same time.
Warning
This still took multiple days with a 6TB drive :(
Safely copying files
One problem I ran into was; how do I make sure everything is copied over safely from one pool to another? I could drag and drop folders, but that would have taken months and risked missing data. Best bet was to use rsync (which is also the fastest way to transfer). rsync has the added benefit of using checksum checking to verify all data is safely transferred with no errors. Luckily both systems were on linux, which made this easier.
Note
I started by doing this after logging into my old Terramaster NAS and performing the rsync operation from there. This was a bad idea and too longer, because the OS is slow and CPU can not handle handling all this plus 10GB networking at once. If you do this, do this from a system with a decent CPU.
- Mount your systems together via the device with the best CPU
#mount in fstab
# <file system>     <dir>       <type>   <options>   <dump> <pass>
nas:/mnt/md0/VODS /mnt/tnas/vods  nfs      defaults    0       0
- Run
rsyncin the shell and move your folders using recursive options
# Coping folders recursively with Progress & Stats
sudo rsync -avh -A --no-perms --progress --stats /mnt/tnas/store/Backups/ /mnt/store/vault/Backups/ &
Note
rsync keeps logs and will run faster the next time around. Recommend running it a few times to add a extra verification that all your files have transferred.
Note
You can use --progress --stats and the & operator to send the job to the background. This will alow you to bring the job to the foreground whenever you want to check on progress. This is super useful when transferring terabytes of data.
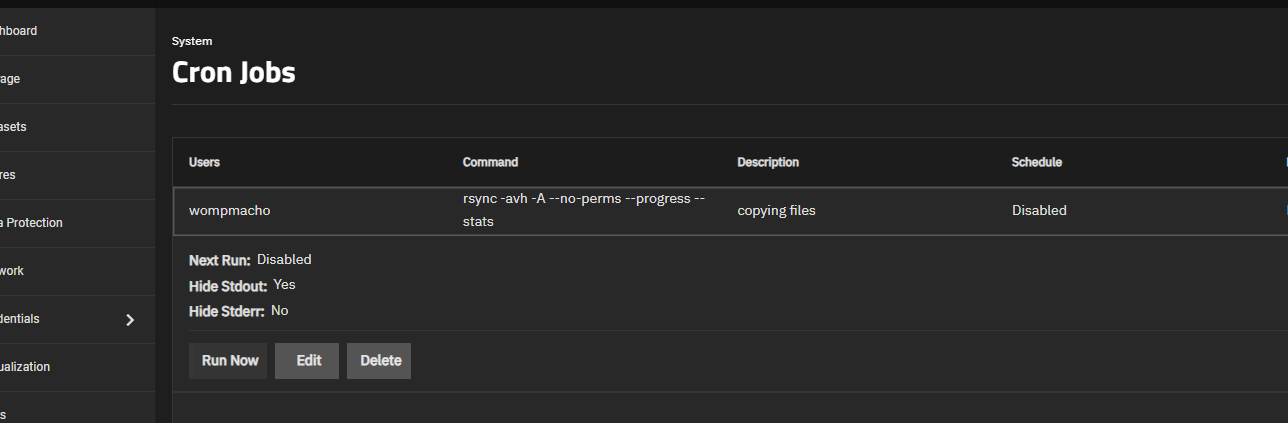
Note
If doing this from TrueNAS, might be better to set this up as a one time cronjob. TrueNAS might kill this job if you lose connection to the shell while transferring.
- add the job using the user interface (do not enable the job)

- run the job when you are ready to move files
How to connect to a NAS
CIFS
Common Internet File System (CIFS) is a network file sharing protocol that allows applications on computers to read and write files and request other services from remote servers. Think of it as a way for your computer to talk to another computer (or storage device) to access files. It's most commonly associated with Windows environments, but it's used by other operating systems as well. It is relatively secure, requiring username / password login to remote systems.
Note
You might need this if you want to connect a Windows machine to one running linux like a common NAS (my use case).
One example of a use case is a jellyfin container that needs persistent data access for media (movies / tv shows) served from your nas. This will need this to be mounted to the OS docker is running on and pass this through with the volumes option in your docker compose file.
To add CIFS to Linux
For this you will also need the keyutils & cifs-utils packages. The keyutils package is a library and a set of utilities for accessing the kernel keyring facility. cifs-utils package provides a means for mounting SMB/CIFS shares on a Linux system.
Then we will need to mount the remote storage via fstab so that it will automatically mount to the OS every time the os boots.
- create a file in your home directory "~/.smb"
Info
The file should contain your NAS credentials (domain optional/depends on your nas settings)
- Create an entry in the fstab
- Add an entry to the bottom line of the file
# //{Nas_IP/Hostname}/{Nas_Mount_Point} /mnt/{mount_name_on_docker_os} cifs credentials=/[path_to_credentials].smb,x-systemd.automount 0 0

# Example:
//nas.home/store /mnt/store cifs credentials=/home/wompmacho/.smb,x-systemd.automount 0 0
- Save your file and re-mount all
- make sure your mount section of your docker compose matches the
mount_name_on_docker_osand reboot your system
Success
You can check that they are mounted by navigating to where you mounted the files
NFS
NFS (Network File System) is a distributed file system protocol that allows users to access files and directories over a network as if they were located on their local computer. It's a way for your computer to talk to another computer (or storage device) to access files, similar to CIFS, but more commonly used in Unix/Linux environments.
Warning
There is NO SECURITY on NFS. It uses existing ACL groups to manage permissions. Only use this on a local network and for trusted devices.
Success
On TrueNAS you can limit access to on IP address or limit within your local domain.
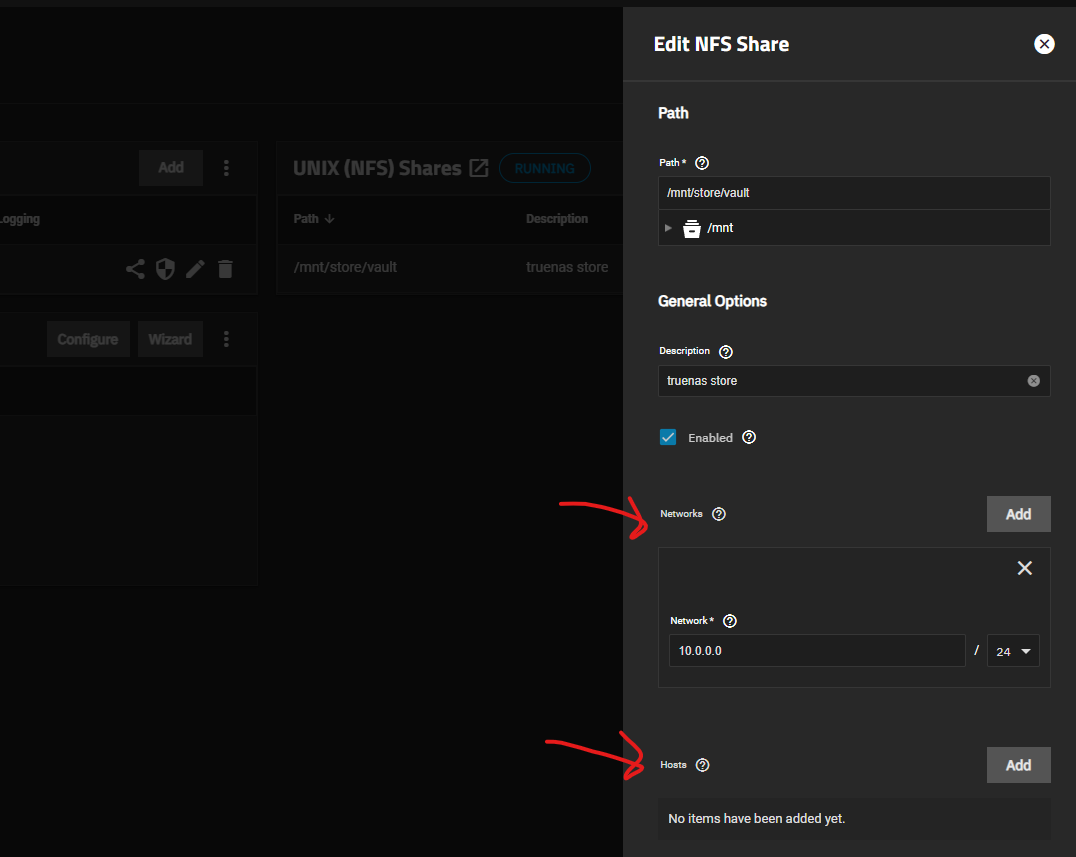
Info
One thing to consider when working with TrueNas: - When creating the initial dataset in your pool, set the zfs aclmode on the dataset in question to passthrough. - Special thanks to anodos you solved am issue plaguing me --> Truenas Forum
SMB
Server Message Block (SMB) is a network communication protocol that allows computers to share files, printers, and other resources with each other. It's the foundation of file sharing in Windows environments, but it's also used by other operating systems like macOS and Linux.
To connect to a SMB share on Windows:
- Right Click to add a
Network Location
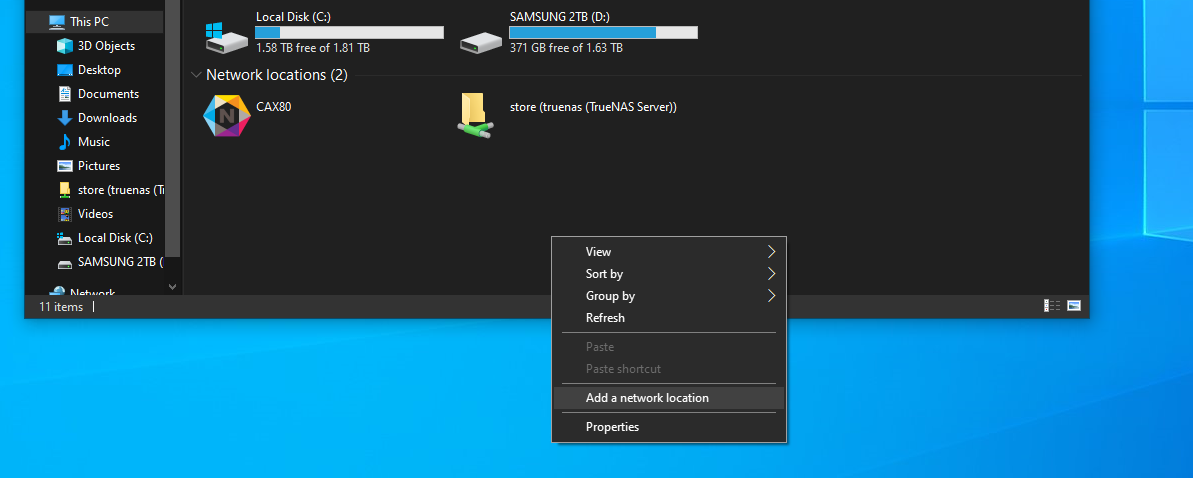
- Use the IP address or hostname of the NAS and the share path provided to your folder access
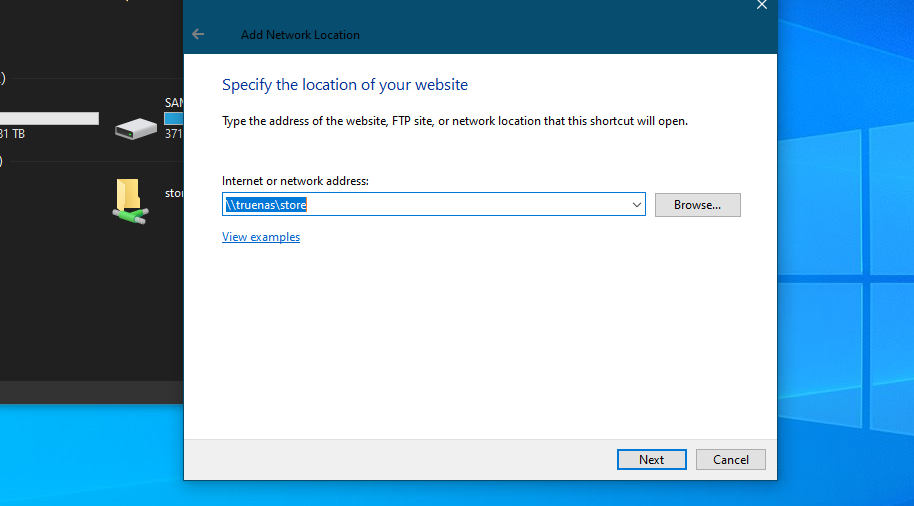
Note
For windows you will need to enter a username / password for access to the share